🚀 Elevate your creativity with precision and power—print like a pro, no pause, no limits!
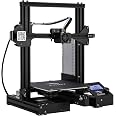
The Official Creality Ender 3 is a high-precision FDM 3D printer featuring a ±0.1mm accuracy nozzle, a large 220x220x250mm build volume, and a rapid-heating bed that reaches 110°C in 5 minutes. Designed for professionals and enthusiasts, it includes a resume printing function to safeguard projects from power interruptions and an advanced extruder to minimize clogging, ensuring reliable, high-quality prints every time.

| Item Weight | 7 Kilograms |
| Item Dimensions D x W x H | 8.66"D x 8.66"W x 9.84"H |
| Printing Technology | FDM |
| Compatible Material | Polylactic Acid, Metal |
| Connectivity Technology | USB |
| Compatible Devices | Personal Computer |
| File Format | OBJ |
| Enclosure Material | Acrylic |
E**O
Good 3D printer
Nice 3d printer for beginners, the assembly is straight foward and there are tons of videos for help. Print quality is good, altough the noise ot is a bit high. Good printer for beginners overall and you can upgrade it
M**X
Easy to build, not for begineers though
Before starting your first printLevel the bed (it comes slightly unleveled)Measure the correct amount of Esteps for the extruder. Mine was slightly under-extruding. (Calipers are recommended)After watching plenty of videos on the Ender 3's print quality, I decided to buy one. Out of the box the bed comes a little unleveled so leveling is required (no matter just release steppers, take a piece of a paper and raise/lower the bed until paper catches). My machine came with the newer with the 32 bit board and comes with a bootloader for easy firmware flashing, no Arduino needed just load .bin onto SD and turn on the machine and flash. The first thing you should do upon receiving the printer is checking the bed is level. A nice way of simplifying this process is to flash a brand new Marlin firmware with manual mesh bed leveling enabled (which is a great option if your bed came warped. The wonderful thing about the ender 3 is that it is so common, there are plenty of modifications that can be made since the community for it is huge. A BLtouch is a mod that people put to automate the bed leveling process. Once you get this printer you're gonna feel like purchasing many upgrades for it. The printer does come with a loud stepper driver so if you don't want to hear whirring and beeping for hours on end place the printer into a room or buy Creality's 4.2.7 board with silent stepper drivers or SKR Mini E3. As for overall print quality, it takes a couple of prints to tune in the settings making this printer a great first printer for starters however it does take a decent amount of time to level the bed and get settings right.Finally, buy a raspberry Pi 3 or better and webcam for OctoPrint. Essentially, it allows your printer to have WiFi printing capability among other tools like WiFi monitoring. notifications via Discord and timelapse snapshots. Octoprint is truly an amazing piece of software and if you have this printer, use it!
K**E
Learn how to adjust it and it's fantastic... but noisy.
I'm writing this review after a long first day of printing. I'm pretty happy with it, honestly. This is great value. After having built a larger but remarkably similar printer from scratch, I'm also not convinced they're losing money on it. So at least this isn't a case of Chinese dumping. It's simply a good product at a fair price, for once.My first two prints came out looking fantastic. The provided white PLA wasn't enough to complete the dog model, but my somewhat old and probably wet yellow PETG printed just fine as well. Adhesion was quite good on the provided print surface.Obviously, your results may vary. I don't know how good their quality assurance is, but most Chinese manufacturers seem to struggle with it. It could be that I got one of the good ones. The rails aren't bent, the belts are intact, the steppers all work just fine.The electronics are noisy, though. Given the price, this isn't surprising, but it is something most people will probably want to upgrade. Going with something with TMC2208 or better stepper drivers will almost certainly solve the problem.Overall, I'd say it's a good printer for beginners, but not if you're a buffoon or just not mechanically inclined. Learn how to tune this in, and it'll serve you very well. Ultimately, I gave this four stars instead of 5 because of the noise issue and because the manual doesn't mention the single most important detail for making this printer really shine: adjusting the delrin wheels.Since the manual doesn't mention it at all, I'll give a quick explanation here: the delrin wheels that form the linear bearings for this printer need to be properly tensioned. Do _not_ expect the factory setup to be anywhere near correct. Even if they got it perfect, the shipping process can knock them out of alignment again. The printer comes with little wrenches just for this purpose, so use them!On each set of wheels on the X and Z axes, there is one wheel that is mounted on an eccentric spacer. You can identify it because it has a hex shaft instead of a round one. The larger wrench in the kit should fit this hex. If you turn it, the wheel is pushed slightly inward or outward because it's mounted a little off-center from the bolt hole. This is how you adjust the wheel spacing to make the bearing tighter or looser. You should make it tight enough that you can't feel any play when you try to twist the bearing set, but not so tight that it's difficult to make it roll along the rail. You shouldn't be able to turn the wheels against the rail without the whole thing moving along the rail too.If you still have trouble, take your printer apart again and make sure the ends of the rails weren't damaged in shipping, causing them to not mate up squarely. Since the rails are aluminum, it's relatively easy for the sharp corners to be deformed from minor bumps. If the corners are deformed from impact damage, you should file/sand the deformity off so that the face of the end of the rail can mate flatly against the side of the rails you're bolting them to.If your rails are bent, you'll have to take that up with Creality. There's a warranty for a reason, and that definitely counts. If you aren't sure if your rails are bent, take two of them and place them together lengthwise. Rotate one of them 90 degrees a few times, checking if you can see light coming through between them. If you can, at least one of them is bent. Get a replacement. You spent money on the damn thing, make sure you get what you pay for!
Trustpilot
1 week ago
2 months ago
2 days ago
2 weeks ago